19/11/2025

BMAD Method - Part 1

Let me start by saying I'm not into Vibe coding. Mainly because I know one or two about coding and there fore I see far Vibe coding can go. But I'm not against people who do Vibe coding. It has given more people, rather than traditional programmers to develop their ideas in very short time, very cost effective way. Also Vibe coding is a tool when it comes to do rapid prototyping. Even well established software companies can use Vibe coding for producing demo software. So it is not something to ignore.

I can see Vibe Coding is now evolving, through context engineering. One of the interesting AI assisted coding method which evolved like that is BMAD method

BMAD - Breakthrough Method for Agile AI Driven Development.

Because it follows Agile principals of software development, this method has caught my attention. You can find more details about this method in above listed link.

There are many ways you can use this method. In fact, you can even use this method to analyze your life problems. But I'm more interested in using this in software development. There fore I started using this in VS Code through GitHub Copilot. Following describe how I started.

Before you installing BMAD framework, you need Node.js v20 or above.

Step 1: Install

Go to root of your development folder via terminal (command prompt). E.g. D:\Dev

Execute following

npx bmad-method install


You will see a screen similar to above. This will change as this framework get upgraded. Currently we are in version 4.44.3, but near the inevitable upgrade of version 6.

Step 2: Create project folder

Enter the path for the project. If it doesn't exist bmad installer will create it.

Step 3: Select what framework to install


There are few options to choose from, couple of them relate to game development. But for our purpose we use default "BMad Agile Core System". If you not sure choose this one and continue.

It will ask couple of questions regarding sharding of PRD and architect files. I will choose yes, because most of time these files are huge and having them separated to multiple file in logical points makes it easy for us to refer to them.

Step 4: Selecting IDE


I will be based on VSCode and GitHub Copilot.

It will ask following question:

* How would you like to configure GitHub Copilot settings?

Choose the default to make the process fast. Or choose manual if you want much tighter control.

* To install web bundles.

I will choose no to this. Because you can do the same thing you do with web bundles in IDE.

That's all.

Step 5: Then launch VSCode

You will see something like below when open the project


Step 6: Start Agent

Open Github Copilot Chat in Agent mode and then type:

*workflow-init

This will start BMad method in agent mode with following options:


If it is branch new project, I will start with item 1.


29/10/2025

Get Windows Capabilities - Powershell

Recently I came across very useful PowerShell cmdlet to manage windows OS.

It is called Get-WindowsCapability


It is part of DISM module (the tool we discussed in last blog post).

In order to see all available capabilities (features), you can run following:

Get-WindowsCapability -Online

This shows, component along side with status (whether it is installed on current system or not)

E.g.

Name  : Rsat.ActiveDirectory.DS-LDS.Tools~~~~0.0.1.0

State : NotPresent


Name  : Microsoft.Windows.WordPad~~~~0.0.1.0

State : Installed


Capabilities can be categorized to several categories:
  • .NET Framework 3.5
  • RSAT tools (e.g. Active Directory, DHCP)
  • Language packs
  • OpenSSH Client/Server
  • WordPad, PowerShell ISE, etc.

In the list category is shown as the first part of the name.

If you want to search for specific capability, you can do it using following PowerShell command:

Get-WindowsCapability -Online | Where-Object Name -like "*OpenSSH*"

If you want to installed a capability, you need to use a different cmdlet called "Add-WindowsCapability"

Add-WindowsCapability -Online -Name "OpenSSH.Server~~~~0.0.1.0"

If you want to un-install a capability:

Remove-WindowsCapability -Online -Name "Microsoft.Windows.WordPad~~~~0.0.1.0"

This is very handy way to install components, when you are in a hurry.

Reclaiming Disk Space Safely - Method 1

I was cleaning up my old laptop (which my daughter is using now) and it was severely lacked disk space to operate. I tried conventional ways and able to get some space, but was not enough.

Analyzing the system, I could see there are there are several iteration of windows updates and multiple version of windows components are there. Most of these components are stored in WinSxS folder. Looking at the size of this folder, I could see it is huge.

WinSxS -> short name for Windows Side-by-Side.

How do I clean-up this folder? It was too risky to manually delete stuff in here as it is windows system component folder. There fore I turned to ChatGPT (in old days it would have been Google), to find the answer.

One of the suggestion by ChatGPT was to use dism command line tool.


What is dism command line tool?

DISM -> Deployment Image Servicing and Management. DISM can do lot more than cleaning up WinSxS folder. If you need to know more about it read this article from Microsoft.

You can use following command to analyze the component store:

Dism.exe /Online /Cleanup-Image /AnalyzeComponentStore

You will see output similar to below:

Component Store (WinSxS) information:

Windows Explorer Reported Size of Component Store : 9.17 GB

Actual Size of Component Store : 8.70 GB

    Shared with Windows : 4.04 GB

    Backups and Disabled Features : 4.66 GB

    Cache and Temporary Data :  0 bytes

Date of Last Cleanup : 2025-10-29 02:50:09

Number of Reclaimable Packages : 8

Component Store Cleanup Recommended : Yes

The operation completed successfully.


When you are ready to clean-up, run following command:

Dism.exe /Online /Cleanup-Image /StartComponentCleanup

If your system is stable and you are sure, you don't need to rollback any components add "resetbase" option to above command to clean-up further.

Dism.exe /Online /Cleanup-Image /StartComponentCleanup /resetbase

But after resetting, you will not be able to un-installed already installed updates.


24/09/2025

Introduction to SQL Server Transactions (Transaction Isolation Part 3)

This is third part of "Introduction to SQL Server Transaction" series. You can see previous sections below:

Part 1

Part 2

In this part we discuss how SQL server has implemented concurrency control.

Locking and Versioning

SQL server uses following two techniques to implement concurrency control:

  1. Locking
  2. Versioning

Locking

Locking is the traditional mechanism SQL Server uses to isolate transactions.

When a transaction accesses data, SQL Server places locks on the data to prevent other transactions from making conflicting changes. Locking type and granularity decide the effect of the lock and the scale.

Locking Types

There are different types of locks SQL server can placed. Each lock type has some level of restrictions for other transactions. Here is summary of locking types and what it blocks:


We will have a talk about type of locks and locking in detail in future blogs.

Locking Granularity: Locks can be applied at row level, page level, table level, or even database level. Granularity allows SQL server to not to lock more objects than it required.

When lock is placed on row level, only that row is restricted from accessed by other transactions. Other rows are free to read and write operations, from other transactions. This reduce the blocking

Page level locks on the other hand locks all rows in that page from read or modification (depend on lock type). Same with table and database level locks, they lock more rows, hence more data and prone for more blocking issues.

Locking is primarily used in Read Committed, Repeatable Read, and Serializable isolation levels.

Versioning

Versioning uses a multi-version concurrency control (MVCC) approach. Instead of locking data for readers, SQL Server maintains row versions (multiple version of a row) in tempdb, allowing readers to see a consistent snapshot of the data.

When a row is modified, SQL Server keeps an older version in tempdb so that readers can still access the version valid at the start of their transaction or query.

This is a much recent technique and Isolation levels using versioning are Read Committed Snapshot (RCSI) and Snapshot Isolation (SI).

Versioning helps reduce blocking and deadlocks, improving concurrency.


17/09/2025

Recycling IIS App Pools via Scheduled Task

Don't ask me why (it's complicated), but we had a situation where we wanted to recycle several of our production IIS App Pools on one of our web server.

We want to do this as a Windows Schedule Task, because it was required to be done during very early mornings (daily job, executed once).

Our initial plan was to have a PowerShell script and ran it through Windows Task Scheduler.

So we have asked a script from ChatGPT for that (BTW: who write PowerShell script manually these days?)

This is what was provided:

<#
.SYNOPSIS
    Recycles a specific IIS Application Pool.

.DESCRIPTION
    This script recycles a given IIS Application Pool using the WebAdministration module.
    You must run it with Administrator privileges.

.PARAMETER AppPoolName
    The name of the IIS Application Pool to recycle.

.EXAMPLE
    .\Recycle-AppPool.ps1 -AppPoolName "MyAppPool"
#>

param (
    [Parameter(Mandatory=$true)]
    [string]$AppPoolName
)

# Import IIS module
Import-Module WebAdministration -ErrorAction Stop

# Check if the app pool exists
$appPool = Get-ChildItem IIS:\AppPools | Where-Object { $_.Name -eq $AppPoolName }

if ($null -eq $appPool) {
    Write-Host "Application Pool '$AppPoolName' not found." -ForegroundColor Red
    exit 1
}

try {
    Write-Host "Recycling Application Pool: $AppPoolName ..." -ForegroundColor Cyan
    Restart-WebAppPool -Name $AppPoolName
    Write-Host "Successfully recycled Application Pool: $AppPoolName" -ForegroundColor Green
}
catch {
    Write-Host "Failed to recycle Application Pool '$AppPoolName'. Error: $_" -ForegroundColor Red
    exit 1
}


We could run this following manner:
.\Recycle-AppPool.ps1 -AppPoolName "MyAppPool"

One line for each app pool we want to recycle.

But then, when we asked ChatGPT, to give command line for this to run in Windows Task Scheduler, it has provided this:
powershell.exe
-NoProfile -ExecutionPolicy Bypass -File "C:\Scripts\Recycle-AppPool.ps1" -AppPoolName "MyAppPool"

However, proactively, it has provided much simpler approach as well. That was the surprise here.

ChatGPT has suggested to use appcmd.exe.

Never heard that before. Then I realized it is a command line utility which get installed when we install IIS stack.

It was much easier to use it (though it had less error handling compared to PowerShell script).

%windir%\system32\inetsrv\appcmd.exe
recycle apppool /apppool.name:"MyAppPool"

At the end we choose to use appcmd.exe.

That's something we learned, this week. Thanks ChatGPT.


29/08/2025

Using Own API keys in Various IDEs

AI hype is so high these days, every one want best AI models for least cost. Though they don't cost much individually, when you add up cost for each subscription, it is coming to a substantial amount if you very active in AI world.

There fore, I was wondering what kind of support each main AI agent integrated IDE's provide for bringing in you own key (BYOK) - that is your own AI model API key.

Cursor IDE

Cursor allows to bring your own key as of now (Aug/2025). However there are some limitations. As per their website, "Custom API keys only work with standard chat models. Features requiring specialized models (like Tab Completion) will continue using Cursor’s built-in models."

They do support all major model providers (e.g. OpenAI, Google, Claude, Azure, Amazon)

Github Copilot

Github Copilot only support API keys for their organisational clients. You need to buy organisational membership to enable usage of your own API keys.

Here is the link.

Windsurf

Windsurf support BYOK, however, it only support claude models under BYOK settings.

Here is the link.


26/08/2025

How to See Which Certificate Was Used in an Existing Backup


Recently I have encountered a interesting scenario relate to SQL server backups.

In our environment there are few SQL servers are running. They are backed up and databases are also backed up. So everything was running smoothly. Until it's not. One of our servers has crashed.

Well, no one was worried, because we had backups and there were not much of data loss.

So after we rebuild the server (we built it from scratch rather than from backups, because we need to refresh the OS anyway), and after installing SQL server, we tried restoring databases.

Then only everyone realized that, backups were encrypted. I know it is our bad, we should have tested restoring periodically, but in small business like us, that never get happen.

So how do we restore the backups. We needed the DEK (Database Encryption Key) which those backups were encrypted.

Luckily we found, set of certificate backups which were use to encrypt database backups.

Every one was happy.

However, how do we know which certificate to use on this particular server. Name didn't really give us a clue.

So we had to Google/Chat with AI a bit.

That's when we came up following approach.

First you need to restore the backup with just header only.

RESTORE HEADERONLY FROM DISK = 'D:\Backups\MyEncryptedBackup.bak';

This will show, result set similar to below:


This result set have following columns (56 of them):

BackupName

BackupDescription

BackupType

ExpirationDate

Compressed

Position

DeviceType

UserName

ServerName

DatabaseName

DatabaseVersion

DatabaseCreationDate

BackupSize

FirstLSN

LastLSN

CheckpointLSN

DatabaseBackupLSN

BackupStartDate

BackupFinishDate

SortOrder

CodePage

UnicodeLocaleId

UnicodeComparisonStyle

CompatibilityLevel

SoftwareVendorId

SoftwareVersionMajor

SoftwareVersionMinor

SoftwareVersionBuild

MachineName

Flags

BindingID

RecoveryForkID

Collation

FamilyGUID

HasBulkLoggedData

IsSnapshot

IsReadOnly

IsSingleUser

HasBackupChecksums

IsDamaged

BeginsLogChain

HasIncompleteMetaData

IsForceOffline

IsCopyOnly

FirstRecoveryForkID

ForkPointLSN

RecoveryModel

DifferentialBaseLSN

DifferentialBaseGUID

BackupTypeDescription

BackupSetGUID

CompressedBackupSize

Containment

KeyAlgorithm

EncryptorThumbprint

EncryptorType


Last two columns, EncryptorThumbprint and EncryptorType will tell you which certificate has been used.

Something I didn't know before.

30/07/2025

Introduction to SQL Server Transactions (Transaction Isolation Part 2)

This is second part of "Introduction to SQL Server Transaction" series. You can see previous section here.

In previous module we learned about basics of SQL Server Transaction and properties of the Transactions.

In there, we discussed that among the four ACID properties of a transaction, Isolation is the one that can be modified in SQL Server. In this module, we will delve deeper into the Isolation property to understand its significance.

Why Do We Need Different Isolation Levels? The Concurrency Conundrum


When multiple transactions run simultaneously, they can interfere with each other in undesirable ways. Here are few of those scenarios you might encounter:


1. Dirty Reads: 


Transaction B reads data that Transaction A has changed, but Transaction A hasn't committed (saved) yet. If Transaction A then rolls back (undoes its changes), Transaction B has read data that technically never existed (i.e. dirty data).

Analogy: Let us take a look at Bank Money transfer example again. Transaction A is doing a money transfer between 2 accounts. But before it commit (save) its changes, Transaction B is reading account balances for a report that manager wants. 
  • If there are no isolation between transactions, and if Transaction A fails before it commit its changes, Transaction B has read wrong data for the report. Therefore, this is called Dirty Reads, which will leads to wrong report output.
  • If there are isolation between transaction, transaction B (report) will have to wait till transaction A completes and then read data. But that means, manager will need to wait bit longer to get his report prepared.

2. Non-Repeatable Read: 


Transaction A reads some data. Transaction B then updates or deletes that specific data and commits its changes. If Transaction A reads the same data again, it gets a different value (because values are updated) or finds the data missing (because particular row is deleted).

Analogy: In our banking example, Transaction A reads balance of a person and do some calculation to make some decision (for example to see eligibility for bonus interest). Transaction A will make its decisions based on the values it read, if it decide this person is eligible to bonus interest then it will re-read the balance to add the interest. But before Transaction A re-reads, Transaction B deduct the balance of the same person and commit (save) values to database. New balance could be not eligible for bonus. This is called non-repeatable read, because Transaction A couldn't re-read the value it read earlier.


3. Phantom Read: 


Transaction A reads a set of rows based on some condition (where clause). Transaction B then inserts a new row that meets that same condition (where clause) and commits to the database. If Transaction A runs the same query again, it sees a new "phantom" row that wasn't there before.

Analogy: In our banking example, Transaction A reads accounts with high values (e.g. higher than 100000) for a report. Then Transaction B update an account which was not in Transaction A's list and increase that account balance to over 100000. Now this account also matches the condition. If Transaction A re-reads accounts again with the same condition (for example let us say for sub section of a report it was doing), it finds a new account which was not there before (which might leads to confusing results in report).

Isolation levels are SQL Server's way of letting you decide which of these phenomena you are willing to tolerate in exchange for better performance and concurrency. Stricter levels prevent more phenomena but can cause more blocking (transactions waiting for each other). So it is a tread-off between concurrency and data integrity.

In next part of this series, let us take a look at how (what techniques are used) isolation is implemented on SQL Server.


16/07/2025

PostgreSQL: Basic Operations using DBeaver - Part 1

Once you restore a database and create a connection to it, next thing you want to do is have a look at the table structure and data inside those tables.

I'm going to use DBeaver for my database access/operations. Because it is very sophisticated tool, similar to SSMS for SQL server, but I think it has more options.

Let's take a look at how these basic operations are carried out with help of DBeaver tool.


In the "Database Navigator" panel of DBeaver, expand the database you want to access. Under database node, you will find "Schema" node (see picture above). Inside this node you will find all available schemas, in most cases it will be under public schema.
Under the schema, you will find usual database objects such as Tables, Views, Functions and etc.

If you want to see data in table, you can double click on it or you can right click and select "View Table" from the context menu.

This will open table in right hand side pane.


By default this shows first 200 rows in the table, with all columns in a grid view. If you want a text view (in case need to copy records into some where), you can switch to text view.


If you click on arrow icon on a column (in grid view), you get sorting and filtering options for that column.


Filter bar at the top shows current filters:


You can clear them all by clicking on eraser like icon the right side of the filter bar. You can further configure your filters by clicking "filter" icon on the right side.

Bottom bar shows very helpful buttons to interact with the table data.


There are buttons to add/delete/edit records in the table. Then you can export data in table by pressing "Export data" button. Next it shows number of records currently in the grid, followed by total number of records. However, when you initially load the table, it just shows 200+, because it has not counted all rows. If you want to know the total count of records you can click on the button in between two counts.

As you can see DBeaver provide rich set of GUI features to interact with data in your database. Of course you do all of these using plain SQL also.

We will see further feature in another article.


30/06/2025

PostgreSQL - Restoring a database

Recent days I was following Brent Ozar's site on postgresql - smart postgres.

In his articles and classes he use copy of stackoverflow database (postgres version). There fore I wanted to restore it on my test postgres server.

Here is how I did it.

Download the Dump

First I downloaded the stackoverflow data dump (which was created by Brent) using links in his site. See this page for links to data dump torrent and instructions on restoring and configuring it. 

I choose small version of the data dump (which expand to 6GB, but torrent is about 1GB).

Create a Database

In this scenario, I have used DBeaver to help me with database. In DBeaver, created a new database connection.


See above screenshot for settings I have used. I have kept most settings default, but made sure to tick "Show all databases" tick box, this allows me to see all database in addition to the one you specified in the connection.

Once connection is created, select the database node and right click on it. Select "Create New Database" menu item.


Create database dialog appear and enter the name "stackoverflow" in the database name box. Keep all other settings default and press ok.

Your new database will appear under the database node:


Restore

Right click on the newly created database and select Tools > Restore


This will popup the restore dialog. In restore dialog, browse to the downloaded data dump (.sql) file and make sure to "Discard object owners" tick box.

This will make sure some errors are by passed. Due to the way dump was created there are some mis match of owners. This is explained in Brent's page, but he has advice to ignore them, by ticking above box those errors a skipped,


Then press on "Start" button.

Confirm your request:


Progress will appear on the dialog box and depending on the power of your machine it will take about 2-10 minutes to restore.


Once finished, press cancel on the dialog.

Now you will be able to see stack overflow tables on the database:


11/06/2025

How to find usage information on Github Copilot


Most of you already know, Github copilot is very nice addition to VS code and Visual Studio IDE. Past couple of months, it has been very good coding assistant to me in all coding projects, specially in Visual Studio 2022.

I was using Free plan for Github copilot ever since I have started using it. Limits on free plan was enough for me to work on project I worked in past. However, last couple of week development work has increased, there fore I was wondering whether I'm hitting my free plan limits on Github copilot.

When you hover our Copilot icon on Visual Studio 2022, it give following options:


If you click on the "Copilot Free Status" menu, you get something like below:


It just says, when the free limits will reset (monthly). So how to find out how much you have already used.

This is when ChatGPT with search tool came in handy. Following procedure describe how to find the free limit. It is not very user friendly, but for developers, this is not a complicated task.

Step 1: Login to your Github account and go to following URL (preferably on Chrome or Edge): 

https://github.com/settings/copilot


Step 2: Open Developer Tools

  • Chrome/Edge: Press Ctrl+Shift+I (Windows/Linux) or Cmd+Option+I (macOS)

  • Firefox: Ctrl+Shift+K (Windows/Linux) or Cmd+Option+K (macOS)


Step 3: 
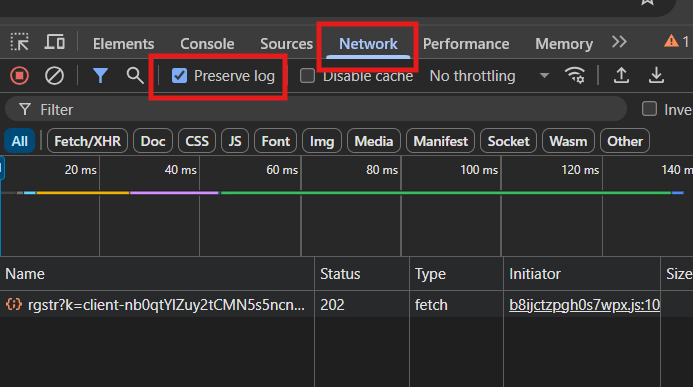
Switch to the Network Tab

In Developer Tools, click on the Network tab and ensure “Preserve log” is enabled to keep track of activity when the page reloads.


Step 4: Reload the Page

Hit F5 or reload the browser page. This captures all network requests, including the entitlement API call.


Step 5: Filter Requests

In the Network filter bar, type entitlement to locate the key request:


Step 6: Inspect the Payload
  • Click the request to open the Headers / Response pane.

  • Go to the Response tab — it should display a JSON object detailing your usage quotas and how much remains.


As you can see in above screen shot, json response show the remaining entitlement. To be clear in above example, account has not used any of his/her entitlement.


SQL Server Performance Tuning Excersises - 1

Couple of weeks ago, I blogged about how I tried to use AI (Claude) to teach me performance tuning. You can read it here . Starting from thi...