Showing posts with label AI. Show all posts

18/07/2026

Claude as your Teacher

I've been focusing and studyingon SQL server performance tuning for more than a year now. I was involved in performance tuning task before, but I wanted to be an expert on that area. So I have been following online courses and doing some self-studies and reading books in my spare time.

However, I still feel I lack real world work, which require to be an expert in that field. Best way to get real world experience is find a job on that area. But in my current job I get very little performance tuning experience. I do get lot more SQL development experience. So do use my knowledge on performance tuning when I develop SQL stuff (e.g. stored procedures). 

This led me to search for some real-world experience, without leaving my current job. I did find some information on internet, but didn't find much useful or catered for me (mostly because performance tuning is case by case issue, I think).

Idea came to me suddenly recently, what if I can use AI tool as my real world experience provider. So I started working with Claude to get something developed. I used "Project" feature in Claude chat.

Let us first have a quick look into Claude Project feature.

You can find Project in Claude in left hand side menu:


Claude Projects has 3 components:

  • Memory -> This is something claude autogenerate, while you work on the project. But you can edit if you noticed something is not correct.
  • Instructions -> Most important part. You can give instructions specific to this project and Claude will follow this everytime it do a task within this project.
  • Files -> Any additional knowledge you want to give to claude on the subject.

Your recent chats relate to this project appear under "Recents" section.

So how did I get Claude to give me (or rather teach me) performance tuning exercises?

I gave following prompt/instruction on the project:

I want to challenge my self by resolving various SQL server performance issues. In order to do this I want you to think like a SQL server performance tuning expert and generate me scenarios with performance issues. I want you to generate these challenges in 3 difficult levels -> Easy, Medium and Expert. When I'm ready, I'm going to ask you to generate a scenario and present me in a particular difficult level. For these challenges, you are going to use AdventureWorks sample database provided by Microsoft (which is publicly available) and StackOverflow database which is also available publicly. I want to generate a query or stored procedure or function with a issue and just tell me what users experience when they use it (issues they face). For this you might also need to give some context information also (e.g. parameters particular stored procedure is running, indexes which are already in use) to me. You might also need to give some script to setup the data and other objects to match the scenario in my testing database (e.g. create or drop index scripts). Once you give me the challenge, I will resolve it and present you the solution, for your evaluation. 

Then on project chat area, I gave following prompt:

Please read the instructions given and present me with Easy challenge.

I'm actually really impressed with results. It gave me a scenario where I have to inspect a slow running stored procedure and identify the issue and give solution for it. Not only it gave me a scenario and excersise, it gave me instructions to setup the database in a manner where the issue is occurring.

I'm not going to explain the whole exercises here as it will make this blog very long. But here are the highlights.

In Step 1, it gave me a script to setup the database. Claude used AdventureWorks database. Because default data didn't cater for this exercise, it gave a script to create alternative "SalesOrders" table with about 1.5 million rows in it.

In Step 2, it continued the setup and told me to create an index in a specific way.

In Step 3, it gave me script to create the troublesome stored procedure.

Finally Claude explained the scenario. Here are the actual text:

There's a "Sales by Year" report page in the app that calls dbo.GetOrdersByYear with a single year, e.g. EXEC dbo.GetOrdersByYear @Year = 2022;. Users are complaining that this report is sluggish and keeps getting slower the longer the system's been live — it used to feel snappy when the table was small, now it's a few seconds and climbing. The DBA is confused because there's a perfectly good index sitting on OrderDate that includes the exact columns the query returns, yet it doesn't seem to be helping. CPU also ticks up noticeably whenever the report runs, even though each call only returns one year's worth of rows.

What I want from you:
Run the proc with the actual execution plan on and SET STATISTICS IO, TIME ON, then come back with three things — the root cause (why that index isn't being used the way you'd hope), your fix (the rewritten proc), and the evidence that it worked (before/after logical reads, plan operator change, and duration). Keep the proc's signature the same; the caller shouldn't have to change how it invokes it.  


Not a very bad exercise to start with, isn't it?

I was able to resolve it. When I presented the solution, for my surprise, it showed me some minor things (e.g. data type conversion, which I didn't think of in this situation as it didn't contribute much), I missed.

I'm going to continue to use it. Hoping to blog a about each exercise, and my solution, so you can also learn something from it. If you have any ideas to improve this project, please comments under this blog.


24/04/2026

Schedule Tasks in Claude Cowork

It is all good to have AI agents helping you. But most annoying thing I see with them is I have to be there to invoke and guide. If there is a agent who activitate it self, it would be great. I know there are several solutions for this. But recently I came across Schedule Tasks in Claude Cowork. So I have given a try.

You need to have Claude desktop app installed on your desktop/laptop to get this working. I'm not going to go into installation of it and configuring it here, and assuming it is already done.
Accessing Schedule Tasks


Once you are in Claude desktop app, go to Claude Cowork tab and there you can see "Scheduled" section.

As per screenshot you see all your already created scheduled tasks. 

One of the most important thing to remember is these schedule tasks are NOT using Windows Task Scheduler or any windows service. Instead it purely depend on Claude App running on the desktop either open or in background. You can see if it is running background by checking apps on system tray. Every minute app check for schedule task list and see if it has a task to run and if it find a one it invoke it.


If Claude app is not running or computer is on sleep or computer is turned off, schedule task will not run on time. 

However, it will do a catch up next time you open up the Claude, if it missed a one. Note that it will only run one catch up. For example if computer was turned off for days, it will only run last missed run.

Scheduled task section has option to make sure computer doesn't go to sleep if claude app is running on background. If running the task on schedule is important, it will be good idea to turn this on.

Creating a Scheduled Task

Press the "New Task" button.

You will something like below:


Here I'm going to create claude cowork schedule task to grab latest tech info for my area of expertise to keep my self up to date.

Below the big box under the description, give proper instruction on what to do. Rather than typing your self you can use LLM chat to create a instructions for it. Here is what I have got as instructions:

18/03/2026

Agent Types in VS Codes

Recently I was working on VS code lot. In fact I was working with Github Copilot lot on VS Code. However have to admit I'm not aware of full capabilities of agentic framework available on VS Code through Github Copilot. I'm just learning as I go.

One of the options you see on Github Copilot window is Agent Type.


There are few options available in this:

  • Local
  • Background
  • Cloud
  • Claude (thirdparty)

I wanted to find out what are the different capabilities of each of the Agent types. Here is my find.

Local

Of course this is the default agent which I'm using most of the time. In fact all the time so far. 

Local agent runs within your VS code environment in your local machine. There fore it has access to all the resouces in VS Code, such as your workspace, files, context (stack trace, unit test results, liniting errors, etc.). 

It can use all models available in VS code. Also have access to all agent tools (browsing, MCP and extension provided tools).

Mostly, it is interactive, you can chat with it and give real time feedback and you can steer them the direction you want easily if you see them going off track.

That's why local agents are the ones I use most.

Background

Background agent, also known as Copilot CLI sessions, run in background. Main feature of this is they run even you close down VSCode. These are well suited for long running tasks, such as you have defined and planned all the steps need to take and where you can sure agent can run independantly long time without your input.

When these sessions require attention, they will notify in chat window same way the local agent would do.

There are two isolation levels for these:

  • Worktree -> create seperate GIT work tree and work independantly to your main code.
  • Workspace -> workspace is where background agent also works in same environment as what you see in VSCode
There are some limitations with background agents. They cannot access all tools in VSCode, plus they don't have access to extension provided tools. Also they are limited to CLI provided models.

Background agent can be start using agent type drop down:


Then you can selection isolation in isolation drop down:


You can also specify a working folder, so agent can independantly work without interfearance:


Cloud Agent

Cloud agents as name suggest runs on cloud (or remote infrastructure). The main cloud agent is Github Copilot cloud agent, which runs on Githug infrastructure (i.e. your remote github repository).

Github Copilot cloud agent as integrated access to Git hub repositories, there for it can do most of the actions (if not all) that any github user can do. Those include large scale refactoring, complete feature development, automatic pull request creation and code reviews.

You can also have thirdparty cloud agents, such as Claude Code and Open AI's Codex.

You can select cloud agent from agent type drop down:


Then you can select repository and give instruction to the agent.

24/02/2026

BMAD Method - Part 2

Since I last talk about BMAD Method (here), about 2 months ago. It has evolved fast. Infact, today (23/02/2206) they have released their newest stable release for version 6. If you can remember, I used version 4.4x in my last article. That's how fast AI industry is moving.

Since then I have used BMAD method successfully in one of production application, and I'm very happy about it.

Since I bought Claude pro subscription recently, I'm going discuss how we can use BMAD method through Claude code (which is the recomended way of using it by its developers).

You can use ClaudeCode, in any terminal (standalone terminal, terminal in a IDE or any other terminal supported way). But since I'm familiar with VSCode, I'm going to use terminal in VSCode to use ClaudeCode.

First thing I would suggest doing in install ClaudeCode extension into VSCode.


Once extension is installed, you can go through onboarding wizard to get it configured. There are several ways you can use ClaudeAI models through ClaudeCode. 

Since I have pro subscription, I will use that. Note that using throug API is very costly. When you click on above button, it will link to your subscription.

Now ClaudeCode extention is configured. Let's get started... well not so fast. ClaudeCode actual program is still not installed in your computer (just the VS Extension is installed). You need to install it using PowerShell.

Here is the command for that (runs on powershell)

irm https://claude.ai/install.ps1 | iex

Or you can download the installation from Antropic.

It take little bit time based on your internet speed to install ClaudeCode through powershell, so be patient. Once installed you need to add installation path to the "Path" environment variable for easy access.


Once ClaudeCode is configured, you can launch it through VSCode. There will be a Claude icon on top right hand corner in VSCode window.

Now that we have both installed and cofigure, open a terminal and let's go to the folder where we want to create the app (or where existing app is).

Then install bmad method with npx:

npx bmad-method install

Since you specify the version, it will ask to install the latest stable version:


Installation wizard starts and following screen appear. At the end of that screen it will ask directory to work.


You can accpet the current directory or give folder path to create a new. If it doesn't exists bmad will ask your permission to create it.

I have chosen bmad6test folder.

Then on next screen you need to select modules. BMAD is a platform where you have core framework and you can add modules according to your requirement. For example, if you developing a Game, you can install "BMad Game Dev Studio" module.


I have chosen BMad Agile-AI Driven Development module.

You can choose to install custom modules, but that for advanced users.

Then the most important decision, you will require to choose which AI tool you will be using BMAD method with.


As you can see Claude Code and Cursor is the preferred ones. But there are long list you can choose from including previously shown Github Copilot.

Next it will ask what should it call you (a name for your self).

Next it will ask, preferred language and output language, where output document should be saved and ect.

Module installation can be done express way or customized approach, but I choose express way and use all defaults (which suites me, but if you prefer you can test with custom approach).

That's it.

After BMAD installation, lets switch to the working directory and start VSCode.

Once you inside VSCode open ClaudeCode.


In the ClaudeCode prompt, you can start typing bmad commands and it will show what is available.


Good place to start is bmad-help method.


01/02/2026

Google Antigravity

These days every one in developer world is talking about Google's Antigravity. So I was also curious  to find about it.


So what is Google's Antigravity? Well, it is Integrated Development Environment (i.e. IDE), similar to popular IDEs like cursor, windsurf and VSCode. Like all of above mentioned, it is a fork of VSCode.

So what is the uniqueness of that? Well, that's what I want to find out too. As per Google, it is not only an IDE, it is an agent management system. In order to find out about more, I decided to install and test.

You can download Google's Antigravity from this site. Available for Mac, Windows and some Linux distributions (e.g. Ubantu 20+). Windows installation is about 152 MB.

Setup starts with usual User Agreement screen:


Then you get to choose the installation location. You will require about 800 MB disk space for this. Next screen allows you to select additional tasks.


Installation is relatively quick (will depend on your computer/disk speed, took only 2min on mine).

Once installed, unlike VSCode, you are taken through setup wizard.


You can import your setting from other similar IDEs. But I choose to start fresh as I didn't want to effect all the testings I have done with other IDEs.

In next step you can select the theme (light, dark, solarized light, tokyo night). I choose dark of course.

Next step is vital. You get to choose how autonomus your agents will be within IDE.


Since this is local installation, agent get access can access all resource in your system, something you might not want to happen. There fore you can select how much freedom you are given to agents. You have 4 options:

  • Secure mode is the safest, in this more agent will ask permission for everything before it go and do something.
  • Review driven development (whic is the recomended), require you to review what agent is going to do before it does.
  • Agent-driven development -> Give more freedome to agent to do most tasks.
  • Custom configuraiton allows you to configure which tasks are allowed and which are not allowed.
In next step you configure your editor.


In order to use Antigravity for free, you need google and gmail account. Wizard will ask you to sign in to this account in next screen.


Final screen is on terms of use.

This is what opening screen looks like:


It is some what similar to VSCode. Note the "Agent Manager" button in the second row in middle. I think is the uniqueness of the IDE.

I will have a play and let you know how my experience is in future blogs.

19/11/2025

BMAD Method - Part 1

Let me start by saying I'm not into Vibe coding. Mainly because I know one or two about coding and there fore I see far Vibe coding can go. But I'm not against people who do Vibe coding. It has given more people, rather than traditional programmers to develop their ideas in very short time, very cost effective way. Also Vibe coding is a tool when it comes to do rapid prototyping. Even well established software companies can use Vibe coding for producing demo software. So it is not something to ignore.

I can see Vibe Coding is now evolving, through context engineering. One of the interesting AI assisted coding method which evolved like that is BMAD method

BMAD - Breakthrough Method for Agile AI Driven Development.

Because it follows Agile principals of software development, this method has caught my attention. You can find more details about this method in above listed link.

There are many ways you can use this method. In fact, you can even use this method to analyze your life problems. But I'm more interested in using this in software development. There fore I started using this in VS Code through GitHub Copilot. Following describe how I started.

Before you installing BMAD framework, you need Node.js v20 or above.

Step 1: Install

Go to root of your development folder via terminal (command prompt). E.g. D:\Dev

Execute following

npx bmad-method install


You will see a screen similar to above. This will change as this framework get upgraded. Currently we are in version 4.44.3, but near the inevitable upgrade of version 6.

Step 2: Create project folder

Enter the path for the project. If it doesn't exist bmad installer will create it.

Step 3: Select what framework to install


There are few options to choose from, couple of them relate to game development. But for our purpose we use default "BMad Agile Core System". If you not sure choose this one and continue.

It will ask couple of questions regarding sharding of PRD and architect files. I will choose yes, because most of time these files are huge and having them separated to multiple file in logical points makes it easy for us to refer to them.

Step 4: Selecting IDE


I will be based on VSCode and GitHub Copilot.

It will ask following question:

* How would you like to configure GitHub Copilot settings?

Choose the default to make the process fast. Or choose manual if you want much tighter control.

* To install web bundles.

I will choose no to this. Because you can do the same thing you do with web bundles in IDE.

That's all.

Step 5: Then launch VSCode

You will see something like below when open the project


Step 6: Start Agent

Open Github Copilot Chat in Agent mode and then type:

*workflow-init

This will start BMad method in agent mode with following options:


If it is branch new project, I will start with item 1.


17/09/2025

Recycling IIS App Pools via Scheduled Task

Don't ask me why (it's complicated), but we had a situation where we wanted to recycle several of our production IIS App Pools on one of our web server.

We want to do this as a Windows Schedule Task, because it was required to be done during very early mornings (daily job, executed once).

Our initial plan was to have a PowerShell script and ran it through Windows Task Scheduler.

So we have asked a script from ChatGPT for that (BTW: who write PowerShell script manually these days?)

This is what was provided:

<#
.SYNOPSIS
    Recycles a specific IIS Application Pool.

.DESCRIPTION
    This script recycles a given IIS Application Pool using the WebAdministration module.
    You must run it with Administrator privileges.

.PARAMETER AppPoolName
    The name of the IIS Application Pool to recycle.

.EXAMPLE
    .\Recycle-AppPool.ps1 -AppPoolName "MyAppPool"
#>

param (
    [Parameter(Mandatory=$true)]
    [string]$AppPoolName
)

# Import IIS module
Import-Module WebAdministration -ErrorAction Stop

# Check if the app pool exists
$appPool = Get-ChildItem IIS:\AppPools | Where-Object { $_.Name -eq $AppPoolName }

if ($null -eq $appPool) {
    Write-Host "Application Pool '$AppPoolName' not found." -ForegroundColor Red
    exit 1
}

try {
    Write-Host "Recycling Application Pool: $AppPoolName ..." -ForegroundColor Cyan
    Restart-WebAppPool -Name $AppPoolName
    Write-Host "Successfully recycled Application Pool: $AppPoolName" -ForegroundColor Green
}
catch {
    Write-Host "Failed to recycle Application Pool '$AppPoolName'. Error: $_" -ForegroundColor Red
    exit 1
}


We could run this following manner:
.\Recycle-AppPool.ps1 -AppPoolName "MyAppPool"

One line for each app pool we want to recycle.

But then, when we asked ChatGPT, to give command line for this to run in Windows Task Scheduler, it has provided this:
powershell.exe
-NoProfile -ExecutionPolicy Bypass -File "C:\Scripts\Recycle-AppPool.ps1" -AppPoolName "MyAppPool"

However, proactively, it has provided much simpler approach as well. That was the surprise here.

ChatGPT has suggested to use appcmd.exe.

Never heard that before. Then I realized it is a command line utility which get installed when we install IIS stack.

It was much easier to use it (though it had less error handling compared to PowerShell script).

%windir%\system32\inetsrv\appcmd.exe
recycle apppool /apppool.name:"MyAppPool"

At the end we choose to use appcmd.exe.

That's something we learned, this week. Thanks ChatGPT.


29/08/2025

Using Own API keys in Various IDEs

AI hype is so high these days, every one want best AI models for least cost. Though they don't cost much individually, when you add up cost for each subscription, it is coming to a substantial amount if you very active in AI world.

There fore, I was wondering what kind of support each main AI agent integrated IDE's provide for bringing in you own key (BYOK) - that is your own AI model API key.

Cursor IDE

Cursor allows to bring your own key as of now (Aug/2025). However there are some limitations. As per their website, "Custom API keys only work with standard chat models. Features requiring specialized models (like Tab Completion) will continue using Cursor’s built-in models."

They do support all major model providers (e.g. OpenAI, Google, Claude, Azure, Amazon)

Github Copilot

Github Copilot only support API keys for their organisational clients. You need to buy organisational membership to enable usage of your own API keys.

Here is the link.

Windsurf

Windsurf support BYOK, however, it only support claude models under BYOK settings.

Here is the link.


11/06/2025

How to find usage information on Github Copilot


Most of you already know, Github copilot is very nice addition to VS code and Visual Studio IDE. Past couple of months, it has been very good coding assistant to me in all coding projects, specially in Visual Studio 2022.

I was using Free plan for Github copilot ever since I have started using it. Limits on free plan was enough for me to work on project I worked in past. However, last couple of week development work has increased, there fore I was wondering whether I'm hitting my free plan limits on Github copilot.

When you hover our Copilot icon on Visual Studio 2022, it give following options:


If you click on the "Copilot Free Status" menu, you get something like below:


It just says, when the free limits will reset (monthly). So how to find out how much you have already used.

This is when ChatGPT with search tool came in handy. Following procedure describe how to find the free limit. It is not very user friendly, but for developers, this is not a complicated task.

Step 1: Login to your Github account and go to following URL (preferably on Chrome or Edge): 

https://github.com/settings/copilot


Step 2: Open Developer Tools

  • Chrome/Edge: Press Ctrl+Shift+I (Windows/Linux) or Cmd+Option+I (macOS)

  • Firefox: Ctrl+Shift+K (Windows/Linux) or Cmd+Option+K (macOS)


Step 3: 
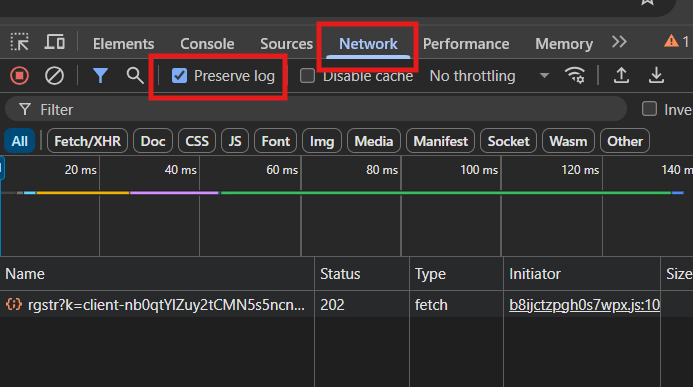
Switch to the Network Tab

In Developer Tools, click on the Network tab and ensure “Preserve log” is enabled to keep track of activity when the page reloads.


Step 4: Reload the Page

Hit F5 or reload the browser page. This captures all network requests, including the entitlement API call.


Step 5: Filter Requests

In the Network filter bar, type entitlement to locate the key request:


Step 6: Inspect the Payload
  • Click the request to open the Headers / Response pane.

  • Go to the Response tab — it should display a JSON object detailing your usage quotas and how much remains.


As you can see in above screen shot, json response show the remaining entitlement. To be clear in above example, account has not used any of his/her entitlement.


30/11/2024

Using Codestral in VS Code - Part 1

This is a part of the series of article where I explain how I learning AI code assistance in VS Code.

You can read the first article here. It explains how you connect Codestral to VS Code.

Ok, now we have connected Codestral to VS Code, lets see how we can use it to assist my coding. In this part I'm going to ask Codestral to write a whole program for me and probably small edit. To simplicity I'm going to use .Net Core console application and ask Codestral to create a snake game in C#.

Get project created

First let's get project created for our game in VS Code. Open a folder and create a new folder called "SnakeGageCodestral" (or any preferred name).

Then open the terminal in VS Code and create console project by running following command:

dotnet new console

That will create the basic structure with Program.cs file in it.


Open the Program.cs and clear any code in it.


Get AI Assistance

Open "Continue" extension. Select your AI modal (in this case we are using Codestral) and ask the question from AI.

You can use a prompt like this: Can you create a snake game in .Net Core console project in C sharp?


Codestral will be more helpful than you think and will also include steps to create project also, but we are intrested in code section. Choose that section (step 4 in below example) and apply it.


This will get updated in Program.cs file.
Check for any obvious compile time errors and if there are you can get assistance from AI by just putting the error message in chat box.

Mine was ok and next step is to run it. Use following command on VS Code terminal.

dotnet run

Mine worked ok.


Editing using AI

Though it worked first time. Snake was running too fast. I wanted to slow it down. So I asked AI assistance to make a edit. It has suggested the line that I should edit as per screen shot below.


That's it. We will have look at more features later.

01/10/2024

Connecting Codestral with VS Code

These days AI hype is so high that I though I also should test some tools I can use to increase my productivity. That's when I came across Codestral by Mistral AI. 

Codestral is a coding assistant tool which can be integrated to your development environment and best of all is, it is free.

So I have tested whether I can integrate Codestral with VS Code. Here is what I experienced.

Step 1 - Create a Mistral AI account. Don't worry it is free (as of now).

Step 2 - Enable Codestral. Codestral is like part of Mistral AI (like a module), but it need activate separately.

Step 3 - Open VS Code and install "Continue" extension. Continue extension is use to integrate VS code and Codestral. This extension can be use to integrate VS Code with other AI Code assistance as well. But we here looking into how we can integrate with Codestral.


Once installed it will appear on left side bar in VS Code.


You can move it to right side, so it will not cover your file explorer and other important sections. But it totally up to you.

Step 4 - Generate API key. Go to Mistral AI website again and go to Codestral section and click on the Generate API button to generate a API key.


Step 5 - Add Codestral to continue extension. Click on the models drop down and click on add chat model.


Then select "Mistral" as the provider and "Codestral" as the model. Enter the API key you have generated before in the box provided. Finally click Connect.

That's it, now you have connected with your Codstral account in VS code.

In next article we see basic usage of the Codestral in VS code.


SQL Server Logical Reads vs Physical Reads

When it comes to SQL Server query tuning, two of the most used phrases are logical reads and physical reads. But do you know exactly what ar...