25/08/2024

SSMS Tips and Tricks - Part 01

I have been using SSMS for so many years now, but here is a trick I learned recently.

Let say you are working on a query window (not query designer), probably with a existing query and you need to add a table with very large number of columns and select all columns by name (rather than using SELECT *).

What is the best way to do this? You can type the query by hand and write all those column names one by one. But that would be laborious/tedious.

Here is a better approach:

Type the query in SELECT * <<table>> format.

Now select the whole line in query window and press Control + Shift + Q key combination.

Viola: Query designer window appear with your query in designer window.

Now, if you just want to add all column to query window, just press ok on Query Designer window.

Query window's query will update to have all column names:


Or you can further edit the query in Query designer window (e.g. add another table) then press ok button when you finish. What ever the query you designed in designer window will write into your query window.

That was very convenient and saved lot of time for me last week.

Also, did you know you can right click on a table in Query Designer and select all column in that table.


28/07/2024

Connecting to PostgreSQL using pgAdmin

If you are using SSMS to connect SQL Server, you probably looking for similar tool for PostgreSQL. Well, you are in luck, for that we have pgAdmin GUI tool.


If you launching pgAdmin tool on the server where you installed PostgreSQL, it most probably launch and auto connect to the local server by default.

If it doesn't or connecting from another computer, you will have to register the server in pgAdmin tool. To do that, right click on the "Servers" node you see under object explorer window, and choose Register -> Server...


This will bring you a dialog box with connection settings. First tab you see is "General" tab.

You can give a name to the connection and specify a background color too.
Next tab is the  most important tab where you specify host address, port number and credentials.


In above screenshot I have shown how I connected from remote machine. I have entered the host IP address and port number, which is the default port number. Then I left others as defaults, such as database name (postgres) and default user name (postgres). You can choose to save your password or enter every time you connect.

Other tabs control advanced connection settings, such as SSL parameters etc. which I will not touch in this article.

So once you done click on the "Save" button and your server is registered and connected.


If you want to run a query on pgAdmin tool, you can use the query tool in there. To open it, expand the "Databases" node and select your database, right click on it and choose "Query tool".

This will open up new window/tab on the admin tool. Note that there are few tabs already opened by default.


Like in SSMS, you can run queries on here and see results in the bottom pane.

There are few other components in this admin tool, but I think I will cover them later, in a specific article to them.


13/07/2024

Connecting to PostgreSQL using psql

In previous article we have looked into how we can install PostgreSQL on a windows machine.

Today I'm going to see how I can connect to PostgreSQL database.

There are two main ways to connect to a PostgreSQL, they are:

  • Using psql -> command line based application similar to sqlcmd for SQL server
  • Using pgAdmin tool -> GUI based application similar to SSMS in SQL server

Using psql

You can easily launch psql from start menu, just search for psql.

Once launch it will ask for server to connect, database to connect, port number to connect and user name and password.

Server [localhost]:

Database [postgres]:

Port [5432]:

Username [postgres]:

Password for user postgres:

If you use default in installation, just accept the default values shown in the prompt. Otherwise you will have to type the value. In above I have accepted all defaults, except password.

If you successfully connected, you will see a warning message on windows, just ignore it.

You will be presented with "postgres=#" prompt.

You can type your queries in this prompt.

Connecting Remotely

If you want to connect to postgresql server which is not installed on the machine you are working on (in other words, remote PostgreSQL machine), you need to do some additional work.

Install psql

  1. First of all you need to install psql on the machine you are going to access from.
  2. Download the (zipped) binaries from the postgre site -> PostgreSQL Windows
  3. Extract files to a directory (e.g. C:\pgsql)
  4. Inside the directory you un-zipped, you will find several folders (e.g. doc, include, pgAdmin, StackBuilder, symbols), if you prefer you can remove these, but don't remove "bin" folder.
  5. You can remove all .exe files except psql.exe from bin folder, but I suggest you keep all of these for future use.
  6. For easy access, add the "bin" directory path (e.g. C:\pgsql\bin) to PATH variable.
Ensure remote access
  • Make sure PostgreSQL server allows remote access. To do this you need to edit pg_dba.conf file on the server. File is located in data folder of the PostgreSQL installation (e.g. \Program Files\PostgreSQL\16\data)
  • Add a line to allow source IP address. Line will be like below
host all all <<your IP>>/32 trust
E.g.: host all all 192.168.2.1/32 trust
  • Open postgresql.conf file (which is same folder as above) in a text editor and make sure, server is listening to all IP addresses. There should be a line like below
listen_addresses = '*'
  • Restart the PostgreSQL server
    • Via Windows Services (GUI)
      • There will be a service called "postgresql-x64-<<version>> - PostgreSQL Server <<version>>", which you need to restart using services GUI.
    • Via command line
      • Stop: net stop postgresql-x64-<version>
      • Start: net start postgresql-x64-<version>
    • Via pg_ctl
      • <<path to postgresql server installation>>\bin\pg_ctl -D "<<path to postgresql server installation>>\\data" restart
      • E.g. "C:\Program Files\PostgreSQL\16\bin\pg_ctl" -D "C:\\Program Files\\PostgreSQL\\16\\data" restart
  • Connecting
    • Run following command on command line of the source computer
psql -h <<ip address>> -p <<port>> -U postgres postgres
psql -h 192.168.2.52 -p 5432 -U postgres postgres

Running Queries

Once you connected, you get postgres=# prompt, where you can type your queries.


In next blog, lets find out how we can use pgAdmin tool to connect to PostgreSQL server.


30/06/2024

Installing PostgreSQL

As per my previous blog on PostgreSQL, I'm going to start a journey to study this new area of interest. As the first step I'm going to install it on my local development/testing environment. I'm gong to follow articles from PostgreSQL Tutorial site and PostgreSQL course on W3 Schools site.

I have downloaded installation package for Window from Enterprise DB site -> https://www.enterprisedb.com/downloads/postgres-postgresql-downloads. As of this article date, I'm using version 16.3 and it is about 375 MB.

I have followed the easy installation wizard.


Select the installation path


Select components. I have selected them all as I'm studying.


  • PostgreSQL server -> the core database engine which you must install
  • pgAdmin4 -> GUI to manage PostgreSQL server (like SSMS)
  • Stack Builder -> Drivers and stuff for development (I guess)
  • Command Line Tools

Select you data directory -> I choose default which is the "Data" sub folder in installation directory

Choose password for super user (administration/sa password)

Choose the port number for the server. I left it default, which is 5432.

Choose locale.

Check the installation summary and make sure all settings selected are looks ok.

Install.

Took about 5 minutes in my not so high end test machine and at the end it has asked me whether I want to launch the stack builder to install additional drivers and all. I choose yes.


At this point main installation is done and you can check the installation by launchign pgAdmin GUI from start menu.

Optionally you can continue with stack builder setup.

Stack Builder Setup

Once main PostgreSQL finishes Stack Builder setup starts with following screen:


You need to choose your PostgreSQL server from the drop down list (in case there are more than one installation).

Then you need to select categories for components to install.


  •   Add-ons, tools and utilities
    • EDB Language Pack v4.3-1 (programming language pack including python)
    • pgAgent (64 bit) for PostgreSQL 16 v4.2.2-1 (Job agent)
    • pgBouncer v1.22.1-1 (connection pooler)
  •   Database Drivers
    • Npgsql v3.2.6-3 (Microsoft .NET data provider)
    • pgJDBC v42.7.2-1 (JDBC driver)
    • psqlODBC (32 bit) v13.02.0000-1 (ODBC driver 32bit)
    • psqlODBC (64 bit) v13.02.0000-1 (ODBC driver 64bit)

  •   Database Server (additional version of Postgre SQL server, which I will not install)
    • PostgreSQL (64 bit) v12.19-2
    • PostgreSQL (64 bit) v13.15-2
    • PostgreSQL (64 bit) v14.12-2
    • PostgreSQL (64 bit) v15.7-2
    • PostgreSQL (64 bit) v16.3-2 (installed)
  • Registration-required and trial products
    • EnterpriseDB Tools -> No idea what these are, hopefully we learn about them in future)
      • Migration Toolkit v57.0-1
      • PEM SQL Profiler Plugin for PostgreSQL 16 (64 bit) v41.2
      • Postgres Enterprise Manager Agent v8.7.1-2
      • Postgres Enterprise Manager Agent v8.7.0-1
      • Postgres Enterprise Manager Server v8.7.0-1
      • Postgres Enterprise Manager Server v9.6.0-2
      • Replication Server v6.2.19 - 1
      • SQL/Protect for PostgreSQL (64bit) v16.0 - 2

  • Spatial Extensions
    • PostGIS 3.4 Bundle for PostgreSQL 16
  •   Web Development
    • PEM-HTTPD v2.4.59-1
Once you select your components, start the installation, which will download components.

This will download various components about 2Gb (depends on what you selected from above options).

Once all components are downloaded, you have options to setup them.


Please note that if you start this installation it will install all the components you choose one by one (each component have separate installation wizard). So if you choose 5 you will have to complete all 5 installation wizards.


24/06/2024

APPLY Operator in T-SQL

APPLY operator was introduced with SQL Server 2005 edition and was great help to join records set with table value function or table value expression.

There are two APPLY operators.

1. CROSS APPLY

2. OUTER APPLY

In simplest terms, CROSS APPLY behave like INNER JOIN and OUTER APPLY behave like LEFT OUTER JOIN.

Let's consider a following example table structure

-- Employee Table
CREATE TABLE Employee (
    EmpId INT PRIMARY KEY,
    EmployeeName VARCHAR(100),
    Age INT,
    BranchId INT
);
-- Branch Table
CREATE TABLE Branch (
    BranchId INT PRIMARY KEY,
    BranchName VARCHAR(100)
);

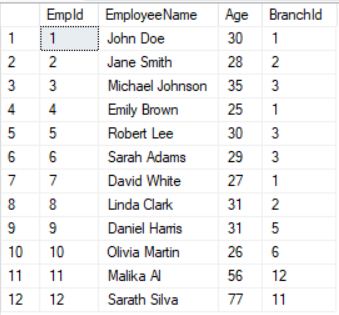
Here is my test data:

Branch Table


Employee Table


I have a table value function which brings branch id and average age of employees in that branch.
CREATE FUNCTION GetAverageEmployeeAgeByBranch
(
    @BranchId INT
)
RETURNS TABLE
AS
RETURN
(
    SELECT BranchId, AVG(Age) AS AverageAge
    FROM Employee
    WHERE BranchId = @BranchId
    GROUP BY BranchId
);

I need to show branch id, branch name and average employee age for that branch in my query. First I have used CROSS apply in my query.

SELECT b.BranchId, BranchName, e.AverageAge
From Branch b CROSS APPLY dbo.GetAverageEmployeeAgeByBranch(BranchId) as e
ORDER BY BranchId

Result as follows:

Then I have used OUTER APPLY:

SELECT b.BranchId, BranchName, e.AverageAge
From Branch b OUTER APPLY dbo.GetAverageEmployeeAgeByBranch(BranchId) as e
ORDER BY BranchId

Result as follows:

As you can see in the first result set, SQL server only brings branches where there are employees on them (i.e. inner join), but on second result set it has bring all branches, where it cannot find employee age, it has put null on them (like LEFT OUTER join).

You can also use APPLY operator with table value expressions (i.e. sub queries).

SELECT b.BranchId, b.BranchName, e.EmployeeName
FROM Branch b CROSS APPLY 
(SELECT e.BranchId, 
STRING_AGG(EmployeeName, ';') WITHIN GROUP (ORDER BY e.EmployeeName) As EmployeeName 
FROM Employee e WHERE e.BranchId = b.BranchId GROUP BY e.BranchId) as e

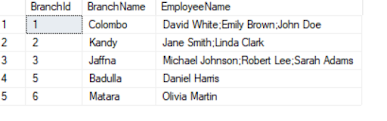
Above query brings concatenated employee names for a given branch:


17/06/2024

Shut It Down Correctly

My new (newish but used, provided by company) Windows 11 laptop keeps drains it's battery even when I shut it down from the Windows Shut Down menu (I turn the wall plug off so battery doesn't keep (trickle) charging over night).

I tried several power settings, but wasn't able to fix it. I wanted it to shut down properly and save battery. I didn't want it to startup quickly, I'm not in a hurry to start it up.

So I start searching for solutions.

That's when I found out Windows 11 hibernate mode and Fast Startup.

When hibernate mode is enabled, even when you shut down the computer from Shut Down menu, it goes to hibernate state, i.e. it will consume power to keep settings on the memory.

Fast Startup, which is another feature in Windows 11, will also make more battery to consume, even though you shut down your computer.

You need to turn off both these options to make it correctly shut down (which I wanted to do).

Turning of Fast Startup

1. Window Search bar (on start menu) type "Control Panel"

2. Control panel, choose "Hardware and Sound"

3. Under "Power Options", choose "What the power button does"
4. Click on "Change settings that are currently unavailable" link.
5. You will see a option called "Turn on Fast startup (recommended)" option. If it is ticked, un-tick it.
6. Save your settings.

Turn off Hibernate mode

1. Open command line (or terminal) under "Administrator"
2. Type following and press enter
         powercfg -h off

Turning off these two will make laptop to shut down properly.

While you are worry about battery, if you need to see very detail report about battery, you can do this by running following command under administrator command line (terminal):
        powercfg /batteryreport /output "C:\battery_report.html"

Note you can change the output path if you wish.


Rebuilding system databases in SQL Server

SQL Server has few system databases, which help it to manage the system. They are:

  • master
  • msdb
  • model
  • tempdb
  • resource

tempdb is rebuilt every time your restart your SQL server, so there is not issues there.

In case of a corruption, how do you re-create all those system databases? One approach is restoring backup for those system databases. But if you don't backup system databases or backups also contains the corruption, you have no other option, but recreate them.

However, note that if you re-create them, you will lost any custom database object you created in those databases (i.e. it is like doing a factory reset) hence you will lost things like customized settings and agent jobs.

Prep

If you want current settings to be applied after restore/rebuild, you need to do following pre-requisite tasks:

        1. Note down current server configuration. You can fetch current server configuration by running following SQL (you probably want to extract this to a excel sheet or to a user database):

            SELECT * FROM sys.configurations;

        2.   If you hoping to restore to latest hotfixes, note down current hotfixes and current collation:

            SELECT

                    SERVERPROPERTY('ProductVersion ') AS ProductVersion,

                    SERVERPROPERTY('ProductLevel') AS ProductLevel,

                    SERVERPROPERTY('ResourceVersion') AS ResourceVersion,

                    SERVERPROPERTY('ResourceLastUpdateDateTime') AS ResourceLastUpdateDateTime,

                    SERVERPROPERTY('Collation') AS Collation;

        3. Following query shows current database file locations. Note this down if you are not using the default locations.

        SELECT name, physical_name AS current_file_location

        FROM sys.master_files

        WHERE database_id IN (DB_ID('master'), DB_ID('model'), DB_ID('msdb'), DB_ID('tempdb'));


Rebuild

In order to rebuild, you need SQL Server installation media. There fore please mount or insert the installation media into the server you are rebuilding.

Then run following command on command line (make sure you are on the correct folder):

setup /QUIET /ACTION=REBUILDDATABASE /INSTANCENAME=InstanceName /SQLSYSADMINACCOUNTS=accounts [ /SAPWD= StrongPassword ] [ /SQLCOLLATION=CollationName ]

There are many other parameters you can specify. For more detail please refer to Microsoft documentation - https://learn.microsoft.com/en-us/sql/relational-databases/databases/rebuild-system-databases?view=sql-server-ver16

Once rebuild completed, you can put your old settings back if necessary.


10/06/2024

Creating Windows Task to Call URL

There are many ways you can call a URL from a windows schedule task. Old time we used vbscript to call a URL. We can create a small console app on .Net (Visual Studio) to call a URL and then schedule the console app to run periodically.

But what is the best and most easiest way these days. I wanted to find out recently as I wanted to call a URL from a website periodically to keep the website live (not going to sleep).

Answer I got from several GPTs were to use Powershell scritp.

This is the powershell command to use:

-ExecutionPolicy unrestricted 

    -Command "(New-Object Net.WebClient).DownloadString('YOUR-URL')"


To call this using a Windows Task scheduler do the following steps:

1. Launch Task Scheduler and create a task (don't select basic task)

2. Give an appropriate name and fill out the properties as suited for you

3. Create a trigger to run the task. You can schedule it to run periodically

4. In the "Actions" tab, click new and type "powershell" on "Program/script" box

5. In the "Arguments" box, type the above text (replace the url with your URL).

6. Click ok and save the task.


Make sure to run the script with a user who have appropriate permission to run powershell and commands.


09/06/2024

Getting into PostgreSQL

PostgreSQL is open source database management system which can compete with more established DBMSs like SQL server and MySQL. In recent years PostgreSQL has grown popularity exponentially. Specially, we can see lot of SQL server and MySQL database experts are turning their attention to it. This is why novice like me also should have a look at what's the fuzz.

There are many theories why PostgreSQL has suddenly become very popular. But I agree that one of the main factors to it is that MySQL community is beginning to distance them self from MySQL, because it is now owned by Oracle (vendor lock). 

In addition to that, I see SQL server new features are becoming less and less enthusiastic people who use it. For example SQL Server 2022, release was disaster to Microsoft, because few of the feature didn't work the way they expected. Plus we are now in middle of the 2024, but there is no sign of the next version of SQL server yet (bit odd comparing Microsoft previous release cycles). So SQL server experts are getting little agitated and they are looking for alternative ways to keep the future bright. When expert do that rest of the community also follows.

From PostgreSQL side also it has become more and more robust over the years to compete with main players in the field. Features like non relational query support and object relational support gives the main advantages.

Considering above, I have also started looking into PostgreSQL basics. In future blogs I will be blogging about my journey with PostgreSQL.

03/06/2024

Check() Constraint in SQL Server

CHECK() Constraint in SQL server is a data validation technique. Using CHECK() constraints, we can minimise data issues that could cause by bad application code or by incorrect queries by user at the database level.

Consider a table like below:

CREATE TABLE CourseSchedule (

    courseId int NOT NULL,

    course_year int NOT NULL,

    course_start_date date,

    course_end_date date,

    PRIMARY KEY (courseId, course_year) )


Let's say we need users (or applications) to insert year as 4 digit year and year should be value between 2000 and 3000. Then we can define a check constraint like below.


CREATE TABLE CourseSchedule (

    courseId int NOT NULL,

    course_year int NOT NULL,

    course_start_date date,

    course_end_date date,

    PRIMARY KEY (courseId, course_year),

    CHECK(course_year >= 2000 and course_year <= 3000))


You can give a name to the constraint. This is really helpful when debugging issue. So you know which table and which column it happened.

E.g.

CREATE TABLE CourseSchedule (

    courseId int NOT NULL,

    course_year int NOT NULL,

    course_start_date date,

    course_end_date date,

    PRIMARY KEY (courseId, course_year),

    CONSTRAINT my_constraint1 CHECK(course_year >= 2000 and course_year <= 3000))


Check constraint can be declared in the line of the column, if it only applied to that column

E.g.

CREATE TABLE CourseSchedule (

    courseId int NOT NULL,

    course_year int NOT NULL CHECK(course_year >= 2000 AND course_year <= 3000)

    course_start_date date,

    course_end_date date,

    PRIMARY KEY (courseId, course_year))


But if it reference multiple columns, it has to be on its own line.

E.g.

CREATE TABLE CourseSchedule (

    courseId int NOT NULL,

    course_year int NOT NULL,

    course_start_date date,

    course_end_date date,

    PRIMARY KEY (courseId, course_year),

    CONSTRAINT my_constraint2 CHECK(course_start_date <= course_end_date))


If you want to drop a check constraint:

ALTER TABLE CourseSchedule 

DROP CONSTRAINT my_constraint2


02/06/2024

Temporary Stored Procedures

I have worked with stored procedures in SQL Server for more than decade now, but only now I got to know the existence of temporary stored procedures. Weird!

Temporary stored procedures works exactly the same way as temporary tables in SQL server.

So their name starts with # for local temporary stored procedures and ## for global temporary stored procedures.

E.g. #thisIsMyLocalTempSp

        ##thisIsMyGlobalTempSp

Same as temporary tables, local temporary stored procedures only available in current session and global temporary stored procedures is available to all sessions, but dropped when session that created it closes.

That make me think, will SQL server allow temporary functions and views too? Unfortunately (or fortunately) my research shows - No.

Note that temporary stored procedures are created on tempdb, so all the issues with tempdb will arise with them (just like temp tables).

So what is the use of temporary stored procedures? Main advantage is I think code re-use. For example if you have a very long stored proc, that uses piece of code over and over again (but you really don't want to create it as a permanent stored proc), you can create a temp stored proc and use it within permanent stored procedure.


SQL Server Performance Tuning Excersises - 1

Couple of weeks ago, I blogged about how I tried to use AI (Claude) to teach me performance tuning. You can read it here . Starting from thi...